
Perennials are the gift in your garden that just keeps on giving! While annuals need to be replanted every spring, perennials grow back year after year. An added perk to perennials is that they are actually relatively simple to care for. With that said, there are a few different ways that you can help your perennials reach their full potential.
In addition to planting them in a location where their lighting needs are met, adequately watering and fertilizing them, and removing or deadheading spent foliage and flowers—we must divide! The reasons why we divide our perennials are pretty much endless, but before you go ahead and start, it helps to learn how to do it properly. Here are a few guidelines to follow for how to successfully divide your perennials in Bismarck.
Why Should I Divide My Perennials?
Before we dive into how to divide your perennials, it might be helpful to explain why we do it in the first place. As we mentioned earlier, the reasons are pretty extensive! For one, it’s a great way to leverage your already beautiful garden. When you learn how to divide perennials, you create more plants that you can distribute throughout the rest of your garden or even trade with neighbors and friends. And, more importantly, it helps to keep your perennials healthier in the long run.
Perennials tend to form large clumps as they grow, and if you don’t divide them every few years, the clusters in the middle can die. This will leave a bit of a bare, awkward bald spot in your garden. Overcrowded perennials, in general, tend to eventually have fewer flowers or smaller flowers when compared to well-spaced perennials. In short, dividing perennials helps your garden continue to have bountiful blooms year after year.

When Should I Divide My Perennials?
Avoid dividing your perennials when they are flowering because they will need to focus all of their energy on re-establishing root and leaf tissue. That means that fall-blooming perennials are best divided in the spring, while spring or summer-blooming perennials are best divided in the fall. But, aside from doing it in the right season, how do we know when perennials are big enough to divide?
The year or year after they have their best blooms is a good benchmark. But, that might not always be easy to identify. Other signs you can keep an eye out for include:
– When the flowers and leaves in the center of your perennial are smaller or weaker
– If the middle of your perennial is dead (i.e., you find one of those awkward ‘bald spots’ we mentioned earlier)
– Or, if they are starting to crowd their neighbors
When you divide your perennials, try to do so on a cool, cloudy day. It can be a bit of a stressful process for the plants. To ensure that splitting and transplanting them is successful, it’s ideal for your newly planted perennials to be shaded from direct sun for the remainder of the day. Otherwise, you risk drying the plants out.
When you learn how to divide perennials, you create more plants that you can distribute throughout the rest of your garden or even trade with neighbors and friends!
How To Divide Perennials: A Step-By-Step Guide
Now, the part we’ve all been waiting for! How do you actually divide perennials? In addition to selecting a cooler, overcast day, it’s even better to divide perennials when there is rain in the immediate forecast to ensure there is enough moisture for the new transplants. Rain in the days prior, or watering your soil a day in advance, can also help as it’s a lot easier to dig up plants from wet or moist soil. Here are some more of the nuts and bolts of how to divide perennials:
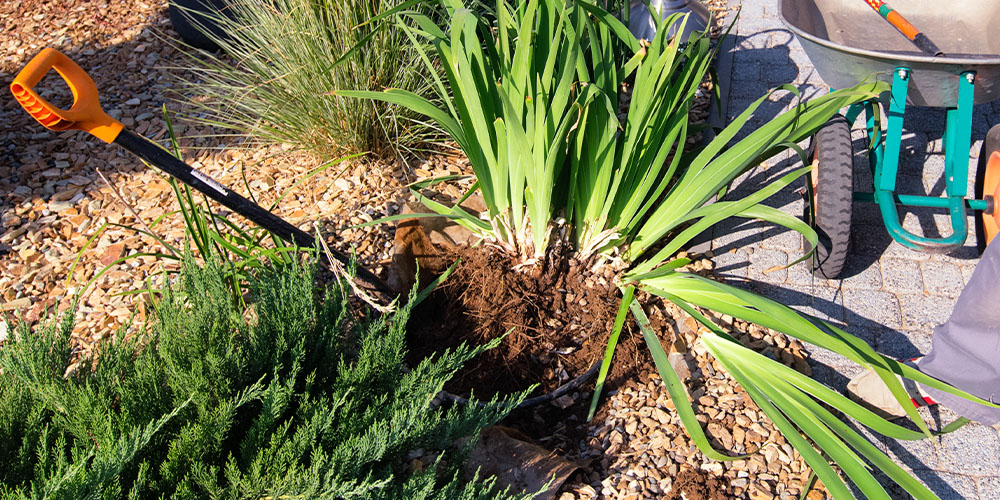
- Dig up the entire existing plant with a fork or a spade shovel (be sure to dig around the plant at least as far as its leaves reach)
- Very carefully lift the perennial plant out of the ground and gently remove loose dirt around the roots
- Separate small sections of the plant by…
– Softly teasing the roots apart with your hands (this method is ideal for smaller plants with more delicate root systems)
– Cutting them with a sharp, sanitized knife or spade shovel
– If it’s a very large plant, take two garden forks, place them back to back in the middle of the root ball, and pull the two halves slowly apart.
Once your perennial is out of the ground, and you have split it into smaller sections, you can take a bit of a closer look at it. If there are any visibly rotten roots, discard them in the compost, as they are likely the part of the plant that was starting to die back.
The next step is to replant your new, smaller clumps of perennials in the ground. This is something you’ll want to do pretty much immediately after digging them up as, like a fish out of water, root systems dry out pretty quickly once they are out of the soil. If, for whatever reason, you can’t put them in the ground right away, give them a temporary home in a pot and keep their roots moist until you get them in their permanent home. Once you plant them in the ground, adding mulch around the base of the plant can help protect it from weeds and help it regulate moisture.
And that’s pretty much all there is to it! Simple, right? Knowing why, when, and how to divide perennials is a great skill to have that will help your garden continue to look lush and beautiful for years to come. If you’re on the hunt for the best perennials of 2021, stop by the garden center! We would love to help you get prepped for the garden season ahead.